
The Submissions page shows every instance of an assignment of a resource for a class.
If you assign a chapter checkpoint to a class and then assign it again to just 5 students in the class, all instances for both assignments will show up on the submissions page.
1. To access all Submissions for a resource for a class, go to Assignments from the class card or from the top right menu.
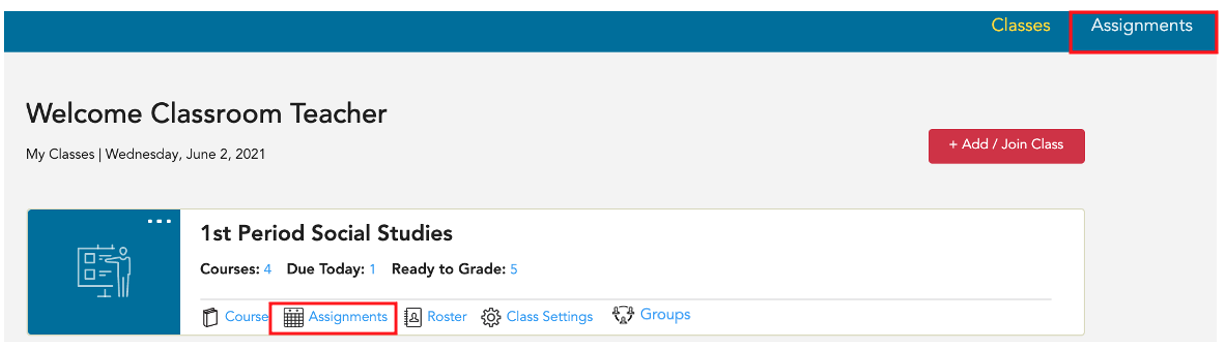
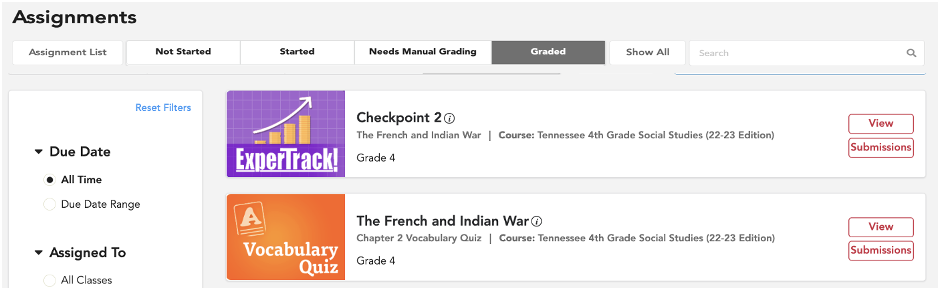
2. You will see assignments organized by status: Assignment List, Not Started, Started, Needs Manual Grading, Graded, or Show All.

3. Use the tabs (Not Started, Started, Needs Manual Grading, Graded, Show All) to locate the assigned resource.
-
Assignment List provides a list of everything assigned.
-
Not Started includes assignments with at least one student who has not started the assignment and includes assignments with a start date in the future.
-
Started includes assignments with at least one student who has opened but not submitted the assignment.
- Needs Manual Grading shows assignments with at least one instance of manual grading that needs to be completed and also includes closed assignments with at least one student who did not submit.
-
Graded shows assignments that are graded (manually graded or auto graded).
- Show All includes assigned resources across all statuses.
4. Select Submissions.

5. This will take you to the Submissions page for the resource where you will see EVERY assignment for the resource within the class.
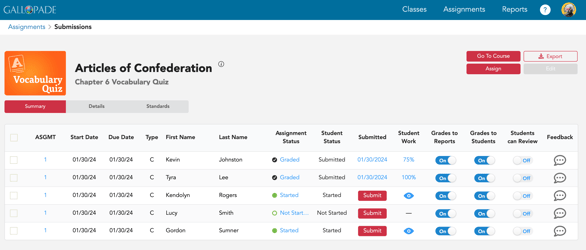
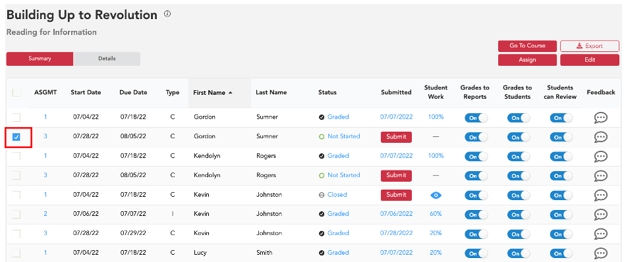
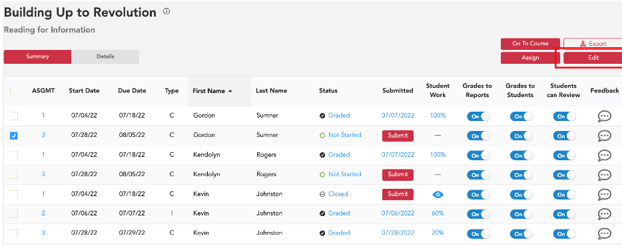
Submissions Page Column Overview
Selection Column: This column allows you to select all or specific assignments.
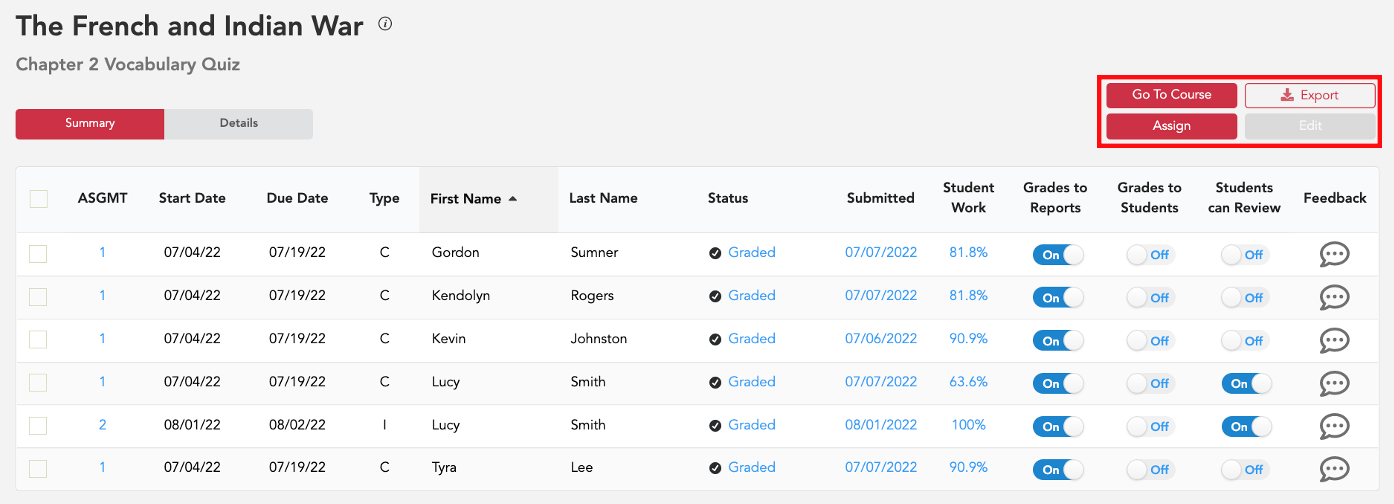
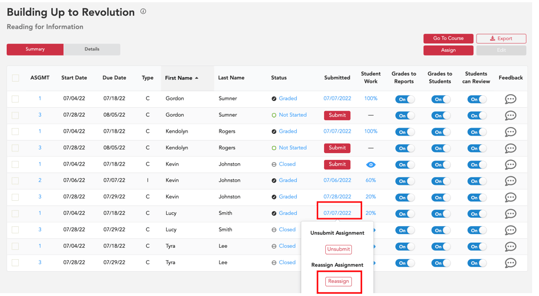
ASGMT: This shows the assignment number. Click or hover/roll over the number to see the nickname. Click or hover/roll over the number and select Edit to open assignment settings. In the image above, 1 was a whole class assignment where the assignment has the same number for all in the class. 2-11 were individual assignments. Each individual assignment is numbered separately.
Start Date: This shows the assignment start date designated by the teacher.
Due Date: This shows the assignment end date designated by the teacher.
Type: This will display a C for a class assignment (managed as individual assignments or one assignment for whole class), a G for a group assignment(managed as individual assignments or one assignment for whole group) , or an I for an individual assignment (assigned to Entire Class as Individual assignments (managed individually) OR assigned to individual students).
First Name: first name of student. *Select the column header to sort by first name.
Last Name: last name of student. *Select the column header to sort by last name.
Assignment Status: Locked, Not Started, Started, Closed, Graded.
- Locked: Due date is in the future.
- Not Started: Assignment is open (due date has not passed) and student has not yet opened the assignment.
- Started: Assignment is open (due date has not passed) and student has opened but not submitted.
- Closed: Assignment is no longer open to the student either because the student submitted it (and it is not yet graded) or the due date has passed.
- Graded: Assignment has been submitted and graded.
Student Status: Not Started, Started, Submitted
Submitted:
allows you to submit/unsubmit assignments *excluding ExperTrack. Expertrack assessments cannot be submitted or unsubmitted by a teacher. If a teacher force submits an assignment, it will not change the Student Status. The student status will still indicate the status according to the actions of the student.
Student Work:
- Select the eyeball to see the in-progress student work.
- Select the pencil to view and score a student's submission.
- Hover the percentage score to see points.
- Select the score to review the graded submission.
Grades to Reports: Set the toggle to release grades to reports when creating the assignment or later by editing the assignment settings. Once selected, grades will move to reports when an assignment has been graded. To edit individual assignments, you can set the toggle directly on the submissions page. For Class assignments, select the On or Off button to go to the settings to make changes.
Grades to Students: Set the toggle to release grades to students when creating the assignment or later by editing the assignment settings. Once selected, grades will be available to students when an assignment has been graded. To edit individual assignments, you can set the toggle directly on the submissions page. For Class assignments, select the On or Off button to go to the settings to make changes.
Students Can Review: Set the toggle to allow student review when creating the assignment or later by editing the assignment settings. If the toggle is set to review, students will have access to view the submitted assignment but not make edits. To edit individual assignments, you can set the toggle directly on the submissions page. For class assignments, select the On or Off button to go to the settings to make changes.
Feedback: You can view, edit, or add feedback.
To sort column data, click on a column header. For example, click on last name to see assignments organized by last name in order to see all assignment instances for a specific student side by side.
Managing Assignment Settings
From the SUBMISSIONS page, you can make a new assignment or make changes to multiple assignment settings at one time. For example, it you assigned something 3 times, with bulk actions, you can edit the Grading and Reports toggles to release grades to students for 1, 2, or all 3 assignments at the same time.
You have buttons to Go to Course (to go back to the Chapter), Export to have submissions data emailed to you, and Assign to make a new resource assignment.
 You will also see a grayed out Edit. To make changes, the first step is to select assignment instances by putting a checkmark in the selected box(es) in the first column. Once you make a selection, the Edit button will become active.
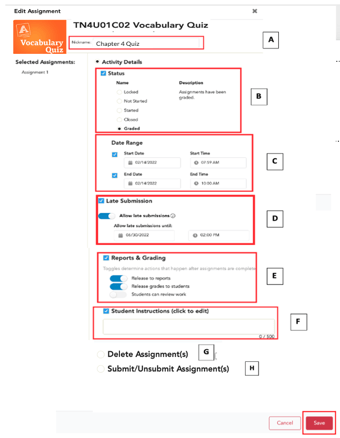
Edit will bring up assignment settings where you can make changes that will apply to all selected assignments. To make changes, select a category.
A. Nickname
B. Status
C. Date Range (Start Date/End Date)
D. Late Submissions
E. Reports & Grading
F. Student Instructions
G. Delete
H. Submit/Unsubmit

Make changes and Save.
How to Delete an Assignment
**Please be aware that deleting an assignment is permanent, and assignments cannot be retrieved after being deleted.
1. To delete, select the assignment(s) in the first column.
2. Select, the red Edit button in upper right.
3. Select Delete Assignment(s).
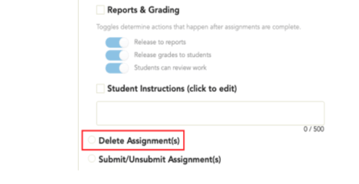
4. Select Delete.
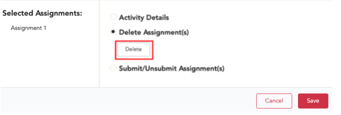
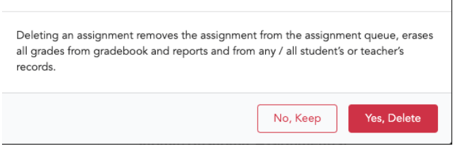
Confirm by selecting Yes, delete OR cancel by selecting No, Keep.
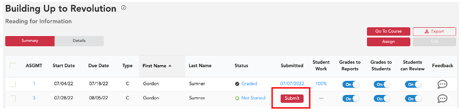
How to Submit an Assignment for an Individual Student
Select the red Submit button.
How to Unsubmit an Assignment for an Individual Student
To unsubmit an assignment to allow students to continue to work on something, select the date submitted, then select Unsubmit. For students to access an unsubmitted assignment, the assignment status has to be active with a due date in the future. Unsubmitting allows students to edit/redo any activity included in the assignment and removes all previous grading.
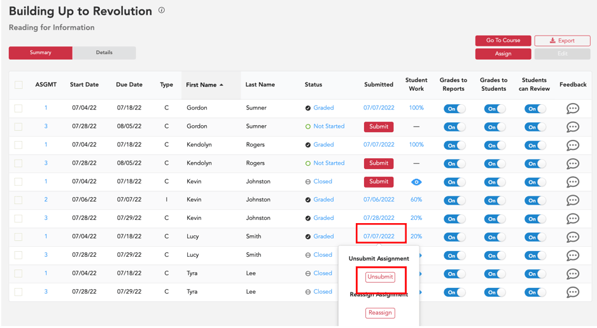
How to Reassign **Reassign provides a brand new, clean copy of the assignment.
Select the date submitted, then select Reassign.
Please note, because ExperTrack is an assessment, ExperTrack assignments cannot be submitted/unsubmitted by the teacher. If a student starts but does not submit an ExperTrack, the grade and review will be visible at the teacher level once the assignment is closed. The grade and review will not be visible from the student's account because it will show as unsubmitted which locks assignments after the assignment is closed. If you would like a student to take an ExperTrack assessment again, you will need to make a new assignment.
To watch a video about All Submissions for class, click here.